If you've got a new iPhone 13 to replace your current iPhone, there are a few ways you can migrate your data across to the new device. You can restore your apps, data, and settings from your most recent iCloud backup, restore from a backup on your computer, or you can use device-to-device migration to transfer your data directly from your previous iPhone to your new one. There are currently known issues with restoring your data from a backup, so this article focuses on how to perform a wireless device-to-device migration.
Without doubt, device-to-device migration will be the most convenient option for most owners of a new iPhone 13. It transfers over information like photos, app data, login credentials, device preferences and settings, and more. As with an iCloud backup, apps themselves are downloaded directly from the App Store rather than from your existing iPhone. It may take a little longer than restoring from a backup, but the time saved from not having to log into all your apps again makes it worth the wait, which is why this process trumps the other transfer methods.
The following steps outline the Quick Start process that you can use to perform a wireless device-to-device migration. As always when transferring data between devices, make sure you have made a backup of your current iPhone, just in case anything untoward happens during the migration process.
- How to Back Up Your iPhone to a Mac
- How to Back Up iPhone on Macs Running Mojave or Earlier
- How to Back Up Your iPhone Using iCloud
- How to Back Up Your iPhone to a Windows PC
It's also worth noting that if your current iPhone has an eSim plan, you'll be asked to "Transfer Cellular Plan" while setting up your iPhone 13: You can either select the numbers you want to transfer or opt to Decide Later to complete the plan transfer after you've set up your iPhone.
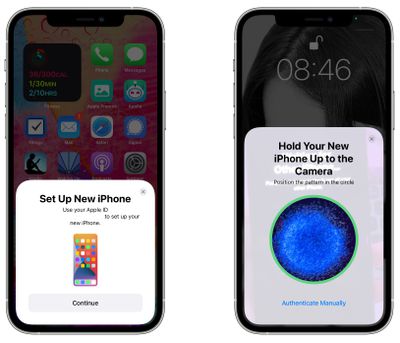
- Plug both iPhones into a power outlet, turn on your new iPhone 13 and place it near your current iPhone, which needs to be running iOS 12.4 or later for the transfer to work. The Quick Start screen will appear on your current iPhone and offer the option of using your Apple ID to set up your new device. Make sure that it's the Apple ID that you want to use, then tap Continue.
- Hold up your current iPhone and center the camera's viewfinder over the animation that appears on your iPhone 13. Wait for a message that says "Finish on New iPhone."

- When prompted, enter your current passcode on your new iPhone 13.
- Follow the instructions to set up Face ID on your iPhone 13.
- Tap Transfer from iPhone to start transferring your data to your iPhone 13. You should be given the choice of whether to transfer some additional settings, such as Apple Pay and Siri, to your new iPhone.
- If you have an Apple Watch paired to your current iPhone, you'll be asked if you want to transfer your Apple Watch data and settings.
- Keep the two iPhones near each other and plugged into power until the data migration process is finished.
The amount of time that it takes to transfer data from one iPhone to another will vary based on what's on the existing iPhone, but Apple provides a data transfer estimate on the main data transfer screen.
If the wireless network you're relying on is too slow, you can perform the data migration using a wired connection, but for that you'll need a Lightning to USB 3 Camera Adaptor and a Lightning to USB Cable. Connect the Camera Adaptor into your current iPhone, then plug the Lightning to USB Cable into your iPhone 13 and the other end into the adaptor. You'll then be able to follow the steps outlined above.
If you plan to sell or trade in your old iPhone to get a bit of extra cash, make sure to adequately erase everything on it to get it ready for its next owner.


Top Rated Comments
What it does is not to directly send everything from the old to the new. Just the settings get overtaken, which apps you had and so on. However all apps everything gets downloaded from the App Store like you would do it in case you do a manual setup. No difference. But overtaking it from the old Iphone will save you a lot of time!