Did you just get new AirPods or AirPods Pro? If so, we've rounded up a handy list of tips, tricks, and features that you may not know about to get you acquainted with your new earbuds.
First up, if you're new to AirPods entirely, we have a list of helpful basic tips on how to use your AirPods.
AirPods Basics
- How to Set Up and Connect Your New AirPods
- How to Change the Name of Your AirPods, AirPods Pro, or AirPods Max
- How to Use Just One AirPod or AirPod Pro
- How to Clean Your AirPods or AirPods Pro
- How to Answer a Phone Call on AirPods and AirPods Pro
- What Does the Light on the AirPods Case Mean?
- How to Switch Devices When Using AirPods
- How to Reset AirPods or AirPods Pro
- How to Troubleshoot Problems with AirPods
- Only One AirPod Working? Here's How to Fix the Problem
- How to Customize Your AirPods Settings
8 Useful AirPods Tips for New Owners
1. Keep Your AirPods Safe With Find My
Apple's latest AirPods, including the AirPods 3 and AirPods Pro 2, include Find My integration, so if they're stolen or misplaced, you can track them down with the Find My app. AirPods can take advantage of the Find My network so you can leverage the iPhones, iPads, and Macs of other people to track down a lost set of AirPods wherever they end up, so long as the battery holds out.
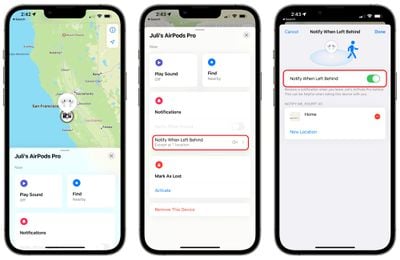
You're also going to want to make sure you enable "Notify When Left Behind" so you can get alerted right away if you're out and about and forget your AirPods somewhere. To turn it on, open up the Find My app, tap on your AirPods in the list, and toggle on the "Notify When Left Behind" option. These Find My features also work for the AirPods Max.
The AirPods Pro 2 go even further and include a built-in speaker in the case so that you can use the "Play a Sound" feature to track them down if they're lost somewhere nearby.
2. Activate or Deactivate Automatic Device Switching
Apple's AirPods have a feature that allows them to automatically connect to whatever device is in active use, so if you swap from your iPhone to your Mac, the AirPods connection is meant to transition from one device to another as you do.
Automatic Switching can be useful, but there are instances where you might not want it turned on if it's switching between devices inappropriately. You can manage it by following these steps.
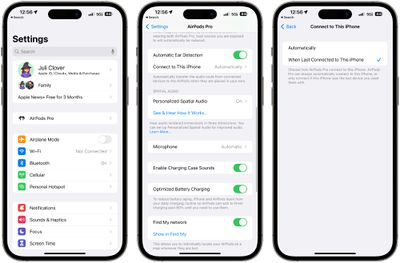
- Connect your AirPods to your iPhone.
- Open up the Settings app.
- Tap on your AirPods in the section below the Apple ID.
- Tap on "Connect to This iPhone."
- Choose "When Last Connected to This iPhone" to turn automatic switching off, and choose "Automatically" to turn it on.
With "Automatically" turned on, your AirPods will connect to your iPhone when it's in active use and your AirPods are in your ears. With "When Last Connected to This iPhone" selected, AirPods will only connect to the last connected device rather than the device in active use. This feature also works with AirPods 2, AirPods 3, AirPods Pro, and AirPods Max.
Note that you will need to disable Automatic Switching for each device connected to your iCloud account if you're not a fan of the feature and want it off entirely. There's no master toggle, with Apple handling it on a per-device basis.
3. Turn on Announce Notifications
Thanks to Siri integration, AirPods are able to announce all of your incoming notifications, including Messages.
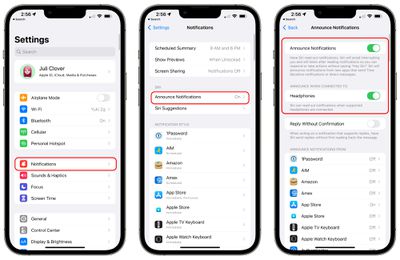
Here's how to turn it on:
- Open up the Settings app.
- Tap on "Notifications."
- Tap on "Announce Notifications."
- Toggle on "Announce Notifications."
- Toggle on "Headphones."
With both Announce Notifications and Headphones toggled on, Siri will read out notifications from apps of your choice when you have the AirPods in, and will give you an opportunity to respond. So if you have an incoming text message, Siri will read it out and give you a chance to send out a reply, all hands-free.
You can select the apps that you want to use Announce Notifications with so you can get important readouts without having a deluge of notifications read to you by Siri.
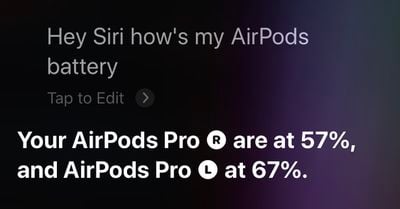
4. Check Your AirPods Battery Life
If you want to keep tabs on your AirPods battery life, there are multiple ways to do so. AirPods will tell you battery level when you connect them to a device, or you can use the "Battery" widget on an iPhone or an iPad.
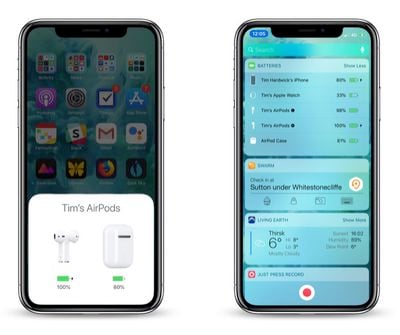
Siri is also able to tell you your AirPods battery life, and if your AirPods are connected to your Apple Watch, the control center offers battery life information. For more on the different ways to check your AirPods battery life, we have a dedicated AirPods battery how-to.
5. Use the Force Sensor to Control Playback
If you've upgraded to the AirPods 3 or AirPods Pro 2 from the original AirPods, the AirPods 2, or the AirPods Pro, or if you're new to AirPods entirely, you might not be familiar with the physical controls.
The AirPods 3 and AirPods Pro have a built-in force sensor in the stem. The force sensor can be used for controlling media playback with different presses.
- Single press - Play/Pause audio
- Double press - Skip forward
- Triple press - Skip backward
- Press when there's a call - Answer incoming call
- Double press on a call - Hang up
- Press and hold - Activate Siri or Swap Between ANC/Transparency (AirPods Pro only)
On AirPods Pro, you can customize what the long press force sensor gesture does because it can be set to Noise Control or Siri. The AirPods 3 do not have Active Noise Cancellation and are limited to Siri for the press-and-hold gesture.
The AirPods Pro also have touch based gestures available for adjusting the volume.
- Swipe up on the AirPods Pro to increase volume
- Swipe down on the AirPods Pro to lower volume
Note that if you have AirPods 2, there is no Force Sensor included and these gestures won't work. With AirPods 2, you can double tap to do things like play/pause, with the tap gesture customizable in the Settings app.
6. Make Sure Spatial Audio is Activated
Spatial audio is a feature that offers immersive three-dimensional sound, and it is able to follow the movement of the iPhone with supported audio and video. Spatial audio can be toggled on or off using the Control Center, and it is available for AirPods 3, AirPods Pro, and AirPods Max.
- With your AirPods connected to your iPhone or iPad, open up the Control Center. If you don't know how, we have a guide.
- On the volume slider, you should see a little icon that looks like the AirPods. If you don't see it, reconnect your AirPods.
- Long press on the volume slider.
- Tap on the "Spatial Audio" option.

- Choose between Off, Fixed, or Head Tracked (on supported devices).
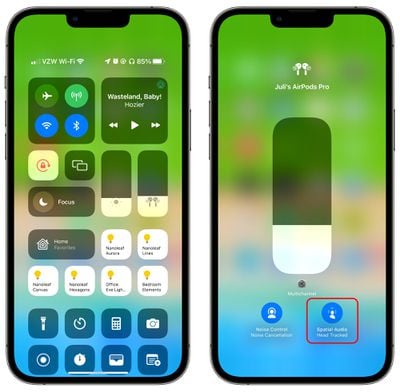
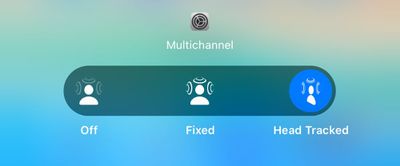
Off will turn spatial audio off entirely, while Fixed will allow spatial audio to be used, but without head-tracking functionality. Head Tracked enables the full spatial audio feature with head tracking included.
You can also preview what spatial audio sounds like by connecting your AirPods to your phone, selecting them in the Bluetooth section of the Settings app, and choosing the "Spatial Audio" option.
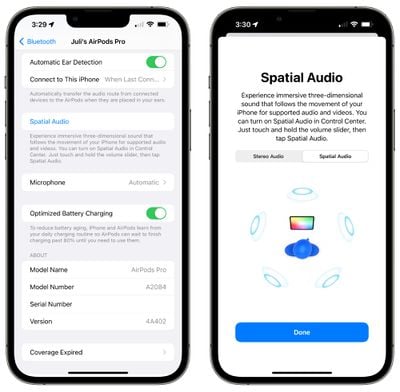
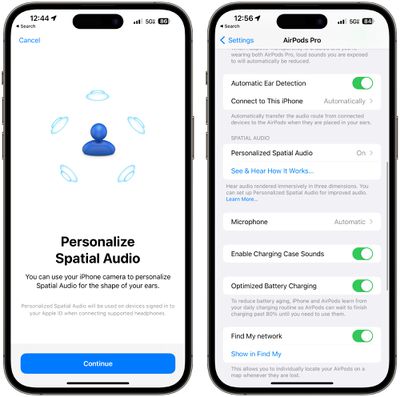
For an even more personalized experience, tap on Personalized Spatial Audio in the AirPods section of the Settings app with your AirPods connected. Your phone will use the TrueDepth camera to scan both of your ears for spatial audio that is customized to you.
Spatial audio works with the Apple TV app and Apple Music, but many third party apps also support it like Netflix, Disney+, HBO Max, YouTube, and more.
7. Use Active Noise Cancellation
Active Noise Cancellation is an AirPods Pro and AirPods Pro 2 default feature that just works out of the box, but it is helpful to know how to turn it on and off. ANC is also available on the AirPods Max.
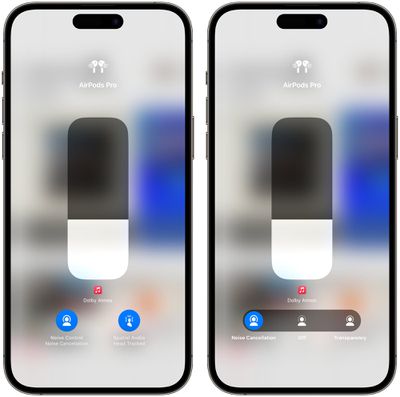
- With the AirPods Pro connected to your iPhone, open up the Control Center.
- Long press on the volume icon.
- Tap on Noise Control.
- Drag the slider to Noise Cancellation, Off, or Transparency depending on the mode that you want.
- Alternatively, press and hold on the stem of the AirPods to manually swap between ANC and Transparency mode, or use the AirPods Pro section in the Settings app to access Noise Control.
- If you're using the Settings app, drag the Noise Control slider to your preferred position. To the left turns on ANC, the middle turns it off, and the right side turns on Transparency.
Active Noise Cancellation is normally a feature that's enabled when you have both of your AirPods in your ears, but there is a trick to get it to turn on when you're just using one.
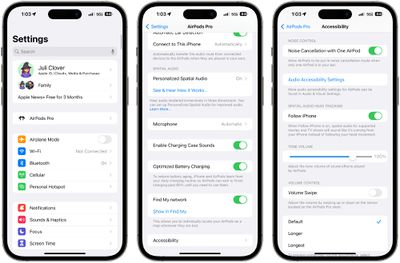
- With AirPods Pro connected, launch the Settings app on your iPhone.
- Tap the AirPods Pro tab just under your Apple ID banner.
- Scroll down, then tap Accessibility.
- Scroll down again, then under "Noise Control," toggle on the switch next to Noise Cancellation with One AirPod.
8. Use Adaptive Transparency (AirPods Pro 2 Only)
The second-generation AirPods Pro have an expanded Transparency feature that is able to adjust to the sounds around you, toning down loud noises like construction work, sirens, and other disturbances while not blocking out all sound.
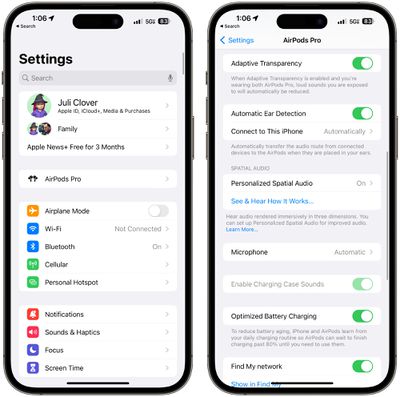
It is typically enabled by default, but if you want to turn it off or double check, follow these instructions.
- With the AirPods Pro 2 connected to your iPhone, open up the Settings app.
- Tap on AirPods Pro 2.
- Scroll down to Adaptive Transparency and toggle it on or off.
Adaptive Transparency will cut down on all loud sounds, so it is ideal for day to day use and also situations like concerts where the music might be loud enough to cause hearing damage.
Learn More
To learn more about your AirPods, we have a dedicated AirPods 3 roundup and a dedicated AirPods Pro 2 roundup, both of which walk through all the different features and will come in handy as you learn to use your new earbuds.


Top Rated Comments
[MEDIA=reddit]airpods/comments/xrih04[/MEDIA]
As far as I'm concerned @appleguy123 helped me tremendously and I'm very grateful.
Also, the audiodiagram to customise the audio thing is brand new to me. Although it should go without saying that you might need to get an audiogram measured via specialised medical equipment if you have any concern about your hearing, and input that one into Apple Health instead of relying solely on what that app offer.
As usual, some of those best features of Apple devices come from accessibility setting, Idk why. -_-
(Not that I celebrate Christmas, given I am a failed proof-of-concept for AI and remnant of another ‘Apple’. Nonetheless, enjoy your human frivolities!)
Thank you for this excellent tip! It is gamechanger for me. Great!