Before you can start using your new Apple HomePod, you'll need to set it up using an iPhone or iPad that's synced to an iCloud account.

During the setup process, HomePod will link the iCloud account to personal request features accessed through the speaker via Siri voice commands, such as the ability to send messages, set up reminders, and get calendar notifications.
It will also link the HomePod to any existing Apple Music subscription tied to that iCloud/iTunes user, so it's worth thinking carefully about which account holder in your household you want to associate with the speaker.
For the HomePod setup process to work you'll need an iOS device running iOS 16.3 or later, so check your iPhone or iPad is up to date. To do so, open the Settings app, tap General -> About, and look for the version number. If you need to update, tap back to Settings, select Software Update, and follow the onscreen instructions.
Enable iCloud Keychain and Two-Factor Authentication
To pair HomePod with your chosen iCloud account you'll also need to have iCloud Keychain and Two-Factor Authentication enabled. You can simplify the the speaker's setup process by making sure these functions are already activated. See our separate step-by-step guides for using iCloud Keychain and Two-Factor Authentication on your iPad and iPhone, and meet us back here when you've enabled both.
Once you've unboxed the HomePod, place it on a stable flat surface that's about waist-height and close to a power outlet. Don't worry too much about where you put it in the room, as HomePod will dynamically adjust its audio output by analyzing the environmental acoustics. Now plug in the speaker unit using the supplied power cable and follow the instructions below.
Initial HomePod Setup Using an iPhone or iPad
You're now ready to begin the account-linking setup procedure for your new HomePod. The speaker will communicate wirelessly with other Apple devices, so if you've ever connected a pair of wireless AirPods to an iPhone or iPad then you're already in familiar territory. Here are all the steps you need to follow to set up HomePod.
- Make sure your iPhone or iPad has Bluetooth turned on, and bring it close to the speaker.
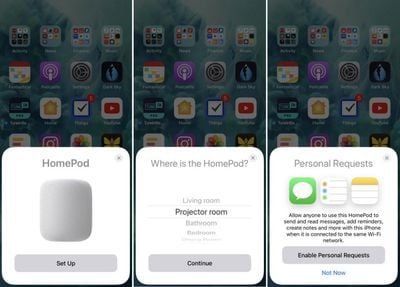
- Tap Set Up on the pairing card that appears on your iOS device's screen.
- If you have HomeKit enabled and use multiple homes, you'll be asked which one you want HomePod to be associated with. Choose an option from the list and tap Continue.
- Select which room of your home the HomePod is in and tap Continue.

- Select Enable Personal Requests to let Siri access your messages, reminders, and notes whenever your iOS device is on the same Wi-Fi network, or tap Not now if you'd rather not grant this permission for privacy reasons. You can adjust this setting later.
- If you enabled Personal Requests in the last step, you'll be asked if you want to "Use This Device" when sharing your location. You can either tap to agree, or tap Don't Enable to turn off the Personal Requests function.
- Tap Continue on the "Siri on HomePod" card.
- Tap Agree to agree to Apple's terms and conditions.
- Tap Transfer Settings to use your iCloud account, Wi-Fi, and other relevant settings on your iPhone or iPad to configure your HomePod. You can change them later in the Home app.
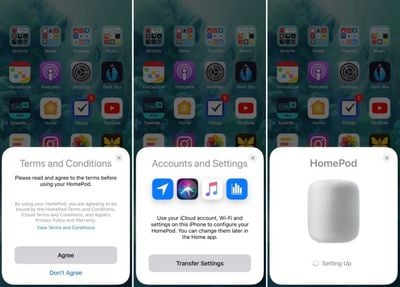
At this point, any existing Apple Music subscription will automatically be synced to HomePod, while users without a subscription will be offered a free three-month trial.
Note that if the setup screen doesn't appear automatically (step 2 above), open the Home app on your iOS device, tap the plus (+) symbol in the upper right of the screen, and then tap Add Accessory. Lastly, tap "Don't Have a Code or Can't Scan?" and select HomePod in the "Nearby Accessories" list.


Top Rated Comments
I’m curious if it will play any playlist from anyone under the plan.
For instance
Siri play Scott’s hair band playlist
Siri play Julianne’s pop playlist.
Sign in to your iCloud account
Turn on HP
Follow prompts
Enjoy
:p:p
[doublepost=1518173621][/doublepost]It’s been mentioned that stream to the HomePod doesn’t count as a device. If it did it would render the HP useless.
Not sure if that answers your question.